Comment installer eSIM sur votre ordinateur portable
Restez connecté en déplacement avec un ordinateur portable compatible eSIM
Résumé
Vous travaillez sur votre ordinateur portable lorsque vous êtes en déplacement ? Si tel est le cas, vous connaissez probablement les inconvénients liés à la recherche d'un point d'accès Wi-Fi ou au partage de connexion depuis votre appareil mobile. Heureusement, les ordinateurs portables intégrés à la technologie eSIM offrent une solution transparente et efficace à ce problème.

Utilisation d'ordinateurs portables compatibles eSIM
L'idée d'ordinateurs portables dotés d'eSIM est devenue une réalité tangible avec le lancement du Surface Pro LTE de Microsoft en 2017. Depuis le lancement de cet ordinateur portable, une multitude de marques d'ordinateurs portables renommées, telles que Lenovo, ASUS, Acer, Dell et HP, ont emboîté le pas en introduisant leurs propres modèles avec des capacités eSIM.
La recherche d'un point d'accès Wi-Fi gratuit ou le partage de connexion depuis vos appareils sont des options possibles pour connecter vos ordinateurs portables. Avec les points d'accès Wi-Fi publics gratuits se pose la question de la sécurité et de la fiabilité, ainsi que du fait que vous devrez être stationné sur place. Le partage de connexion et les points d'accès mobiles, en revanche, tout en vous permettant de vous déplacer, pèsent sur la consommation de la batterie de votre appareil mobile, ce qui est particulièrement important lorsque vous voyagez. De plus, tous les opérateurs n'autorisent pas le partage de connexion en itinérance.
Par rapport aux deux options ci-dessus, les ordinateurs portables compatibles eSIM constituent une alternative efficace. Non seulement ils offrent plus de flexibilité quant à l'endroit et au moment où vous vous connectez, une meilleure sécurité et une meilleure fiabilité, mais ils réduisent également la charge sur la batterie et la consommation de données de vos appareils mobiles.
Activation de l'eSIM sur les ordinateurs portables
Configuration requise pour l'appareil
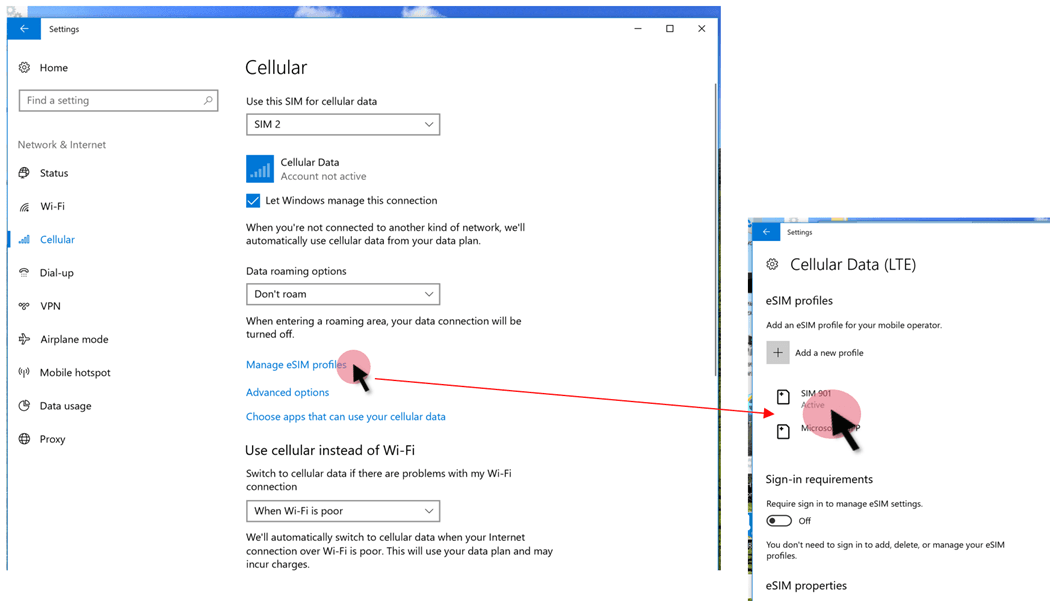
Pour installer une eSIM, votre ordinateur portable Windows doit exécuter au moins Windows 10 (version 1703) ou une version ultérieure. Pour vérifier si votre ordinateur portable Windows prend en charge les eSIM, accédez àParamètres > Réseau et Internet > Cellulaire. Si vous voyez l'optionProfils eSIMcela signifie que votre ordinateur portable est capable de prendre en charge les eSIM.
Si vous utilisez un Chromebook, il doit fonctionner sur la version 92 ou ultérieure. Pour vérifier si votre Chromebook prend en charge les eSIM, accédez àParamètres > Réseau > Données mobilesSi vous voyez leeSIMoption, cela signifie que votre ordinateur portable peut prendre en charge les eSIM.
Comment installer et activer les eSIM sous Windows
- CliquezDémarrer > Paramètres > Réseau et Internet > Cellulaire > Gérer les profils eSIM.
- Sélectionner 'Ajouter un profil'.
- Sélectionner 'Permettez-moi d'entrer un code d'activation que j'ai reçu de mon opérateur mobile" et sélectionnez Suivant.
- Scannez le code QR qui vous a été envoyé par votre fournisseur eSIM.
- Le code d'activation apparaîtra dans leCode d'activationcase et sélectionnez Suivant.
- Téléchargez votre nouveau profil en saisissant le code de confirmation de votre opérateur mobile et en sélectionnantFermer.
- Une fois votre profil installé, accédez àDémarrer > Paramètres > Réseau et Internet > Cellulaire > Gérer les profils eSIMSélectionnez le profil eSIM que vous souhaitez (celui que vous venez d'installer) et sélectionnezUtiliser.
- Pour l'invite « Cela utilisera les données cellulaires de votre forfait de données et entraînera des frais. Voulez-vous continuer ? », sélectionnezOui.

Comment installer et activer les eSIM sur les ChromeBooks
- En bas à droite de votre écran, sélectionnez leheure > Paramètres.
- Sous « Réseau », confirmez queDonnées mobilesest allumé.
- Sélectionner Données mobiles > Ajouter un réseau cellulaire.
- Lorsqu'un écran de numérisation de code QR apparaît, sélectionnez Utilisez l'appareil photo pour scanner le code QR.
- Pour scanner, maintenez le code QR fourni par votre opérateur devant la caméra de votre Chromebook.
- Le code d’activation se chargera automatiquement. Si le code d’activation ne se charge pas automatiquement, saisissez-le manuellement.
- Sélectionner Suivant.
- Lorsque vous recevez le message « Le profil a été ajouté avec succès », sélectionnez Fait.
- Une fois votre profil ajouté, accédez àParamètres > Réseauet confirmer queDonnées mobilesest allumé.
- Sous « eSIM », sélectionnez le profil eSIM que vous souhaitez utiliser.

Ordinateurs portables compatibles eSIM
Vous recherchez un ordinateur portable compatible eSIM ? Consultez la liste ci-dessous pour connaître les ordinateurs portables compatibles eSIM disponibles (mise à jour le 15 août 2023)
Acer
- Acer Swift 3
- Acer Swift 7
- Acer TravelMate P2
- Acer TravelMate Spin P4
- Acer TravelMate P6
- Chromebook Spin 511 d'Acer
- Chromebook Spin 513 d'Acer
ASUS
- ASUS Mini Transformer T103HAF
- ASUS NovaGo TP370QL
- ASUS VivoBook Flip 14 TP401NA
DELL
- Ordinateur 2-en-1 Dell Latitude 7210
- Dell Latitude 9410
- Dell Latitude 7310
- Dell Latitude 7410
- Dell Latitude 9510
- Dell Latitude 5410
- Dell Latitude 5411
- Dell Latitude 5511
HP
- Ordinateur portable HP Elitebook G5
- Ordinateur portable HP Elitebook G6
- Ordinateur portable HP Elitebook G7
- Ordinateur portable HP Elitebook G8
- HP Probook G5
- HP Zbook G5
- HP Spectre Folio 13
- HP Elite Dragonfly G2
- HP Spectre Folio 13
Lenovo
- ThinkPad X1 Titanium Yoga 2 en 1
- ThinkPad X1 Carbon Gen 9
- ThinkPad X1 pliable
- ThinkPad X1 Nano
- ThinkPad X12 détachable
- Lenovo Flex 5G
- Lenovo Yoga C630
- Lenovo Miix 630
- Lenovo Yoga 520
- Lenovo Yoga 720 (modèles 2 en 1)
Microsoft Surface
- Surface Pro 9 avec 5G
- Surface Pro 8 avec LTE
- Surface Go 3 avec LTE
